
A Guide for NCERT Students for Writing Handwritten Notes Easily

NCERT students have to write notes throughout their time at an institute to keep track of what they’ve studied so far. These notes are also supposed to help them prepare for exams when the time comes.
However, writing handwritten notes can be time-consuming and feel like a hassle for many, as most people prefer to type things out nowadays.
Typing your notes can be a good thing, but they can also get deleted or become inaccessible if something happens to your computer. This is why there are people who like to stick with the traditional way of writing notes, and that is to handwrite them.
If you’re a student who has typed out everything you’ve studied in class and want to convert it into handwritten notes, then don’t worry, as we’ve got just the solution for you. The solution is to leverage an online text-to-handwriting converting tool.
Now, you might be wondering how you’re supposed to use a tool like this to create handwritten notes. Well, keep reading as we’ll guide you through the process.
Step-by-Step Guide on How to Use
a Text to Handwriting Converter
Step 1. Select a Good Text to
Handwriting Converter
The first thing you’re going to want to do is to choose a
good tool that can generate effective results and produce handwritten notes
that look like they were written by a human.
For that, we are mentioning below some of the requirements that the tool should fulfill and that you should look out for while selecting a text-to-handwriting converter.
- Uploading documents: Many text-to-handwriting converters allow users to upload a document directly from their device storage. You should try and choose one that allows you to do this since it can save you time, as you won’t have to type or copy and paste the notes in the input box.
- Multiple
handwriting styles: This is one of the most essential things that you
should look out for when selecting a converter because multiple handwritings
can give you a variety to choose from. You can then choose the one that is
similar to your writing the most, which will give it a natural look and make it
easier for you to understand when you’re reading it.
- Various page templates: Selecting a tool that offers different page templates can prove to be a game changer since you can choose which page you like the most, and the tool can provide handwritten notes on that page. Every type of page has a different line length and distance, and most people prefer a specific one.
- Handwriting size adjustment: Every person writes in a different style. Many don’t like writing that is too huge, and many avoid writing that is too small that it requires pinching your eyes just to understand it. By choosing a tool that offers the size adjustment of the handwritten text, you can find the sweet spot that suits you best. Apart from this, it can also fulfill your stylistic requirements.
- Pen color selection: Finding a text-to-handwriting tool that offers multiple pen colors to choose from can be quite handy. This is because you might have to highlight a particular part from your notes to emphasize that it’s an important thing. Besides this, choosing from multiple pen colors can also help fulfill your stylistic choices.
These are all the factors that make a handwriting converter
a good one to use. To make it easier for you, though, we have found an online text to handwriting converter
that falls true to all the factors we’ve mentioned above. We’ll also be using
this one for further demonstration in the upcoming steps.
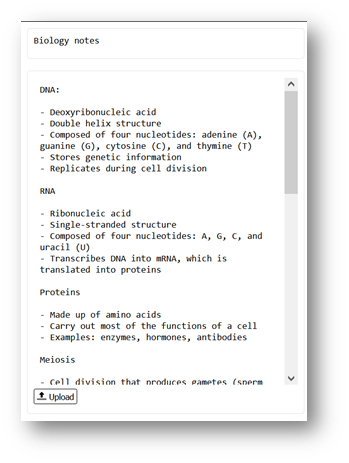
Step 2. Provide It the Input Text
and Title
Now that you’ve selected the text to handwriting converter
that you’re going to use. It is time to provide it with the input text (your
typed notes). You can upload the document directly or copy and paste it into
the input box.
For the title, there’s another box right above the input
one. You can write whatever title you want your handwritten notes to have.
Here’s what it should look like after you’ve provided the
input.
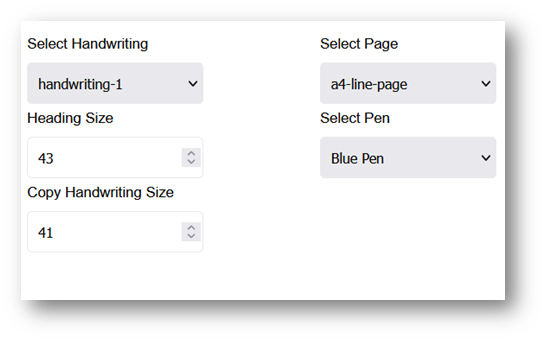
Step 3. Select the Handwriting Style
and Other Options to Your Preferences
After you’ve input your notes into the tool, you should
select the handwriting style, the page, the heading size, the body size, and
the color of the pen that you want.
The tool will already be giving you a preview of what the
selected options will look like in the final output. You can use this to pick
your choices more effectively. All these options are usually given below the
input box, and they look something like this.
Step 4. Download the Output
After you’ve done everything, it is finally time to get the
output generated by the tool and download it. You can download it in two
formats. One is to download it in a PNG image format, and the other is in PDF.
We recommend you download the PDF version of the handwritten
text so you can print it in the form of a copy later on. This way, you’ll have
a true feel of handwritten notes, and it will feel like the notes you wrote
yourselves.
Here’s a demonstration of how the tool generates its output
and how you can download it.
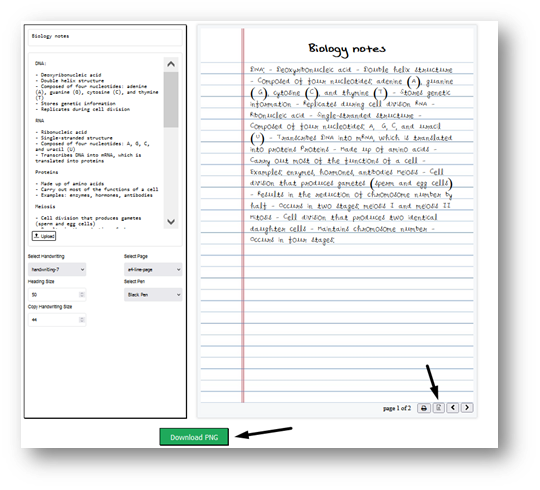
You can click on the “Download PNG” button to download the
output in the form of images and the button next to the arrows to download it
in the form of a PDF.
By following these steps, any NCERT student can create handwritten notes easily with the help of a tool without
having to sit down and spend time manually handwriting them.
Final Words
Handwriting typed notes can be a time-consuming task for NCERT
students. They can get help from an online text to handwriting converter to
make this easier and quicker for them. In this article, we have provided a
guide on how you’re supposed to use tools like these for this purpose.